Configuring syslog on Cisco devices is a straightforward process, and it’s essential for monitoring and logging events across your network. Cisco’s syslog implementation lets you send event messages from routers, switches, and other devices to a central syslog server, enabling you to centralize monitoring and respond to network issues proactively.
- Console Logging: By default, console logging is enabled. It can be turned off with
no logging consoleto save system resources. - Syslog Configuration Options: Cisco devices can store syslog information in the internal buffer or send it to an external storage device.
- Buffered Logging: Use the
logging bufferedcommand to store messages in the internal buffer. Adjust the buffer size and severity level as needed. - External Logging: Use the
logging hostcommand followed by the IP address of the syslog server to send logs to an external server. Set the severity level with thelogging trapcommand.
Here’s a detailed guide on configuring syslog on Cisco devices:
1. Setting the Syslog Server IP Address
First, you need to configure the IP address of your syslog server on the Cisco device:
Router(config)# logging <syslog-server-ip>
Replace <syslog-server-ip> with the IP address of your syslog server. This command tells the Cisco device to send syslog messages to this server.
2. Configuring Syslog Severity Levels
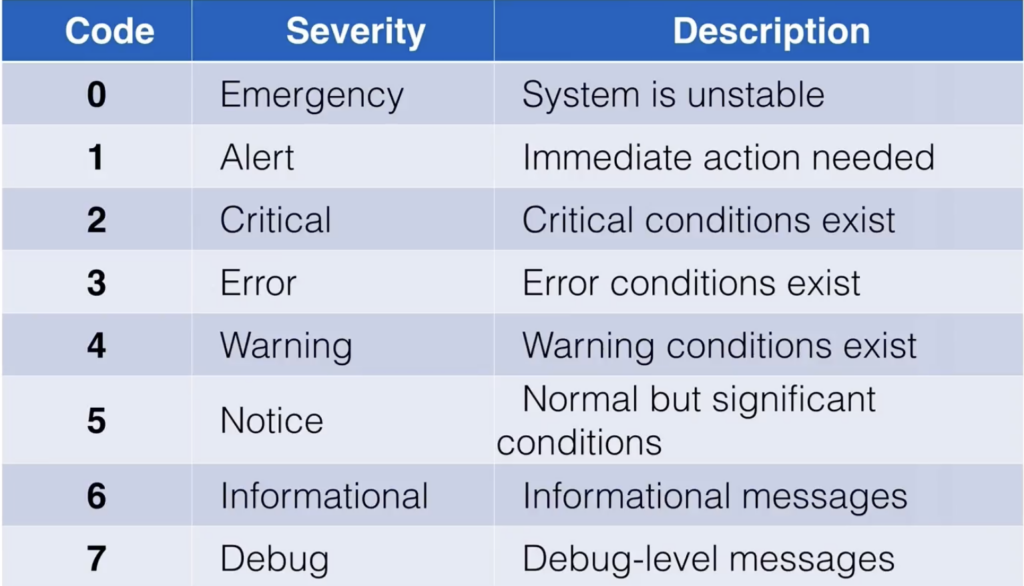
Cisco devices allow you to specify which levels of severity you want to log. There are eight levels in total:

For example, if you want to log all messages at the “warnings” level and higher (i.e., levels 0–4), use:
Router(config)# logging trap warnings
This command ensures only messages with severity level 4 (warnings) and above are sent to the syslog server, helping to avoid log overload.
3. Enabling Timestamps on Syslog Messages
Timestamps are crucial for tracking the exact time of events. Enable timestamps for more detailed log messages:
Router(config)# service timestamps log datetime msec
Adding msec (milliseconds) can give more precise timing, which is particularly helpful when troubleshooting network issues.
4. Configuring Syslog Facility
By default, Cisco devices use the local7 facility when sending logs. If you need to change it, you can specify a different facility:
Router(config)# logging facility <facility>
Facilities are used by syslog servers to categorize logs. For example, use local0, local1, etc., depending on your server configuration and logging needs.
5. Configuring Logging to Different Destinations
Cisco devices can log messages to different destinations such as the console, buffer, or terminal in addition to the syslog server.
- Console Logging: Displays messages on the device’s console.plaintextCopy code
Router(config)# logging console <level> - Buffered Logging: Stores messages in the device’s RAM.plaintextCopy code
Router(config)# logging buffered <level> <size> - Terminal Logging: Sends logs to the terminal lines (useful for logged-in sessions).plaintextCopy code
Router(config)# logging monitor <level>
Set the <level> as needed for each destination to control the type and amount of logging.
6. Enabling Syslog Message Sequence Numbers
Sequence numbers help to identify the order of events in your logs, which can be beneficial when troubleshooting. To enable this feature:
Router(config)# service sequence-numbers
This command adds sequence numbers to each log entry, allowing you to track message order on the syslog server.
7. Configuring Rate-Limiting for Log Messages
To prevent log message flooding, especially during network disruptions, you can set a rate limit:
Router(config)# logging rate-limit <milliseconds>
Replace <milliseconds> with a desired interval between log messages to prevent excessive log traffic.
8. Verifying Syslog Configuration
After configuring syslog, verify the settings with:
Router# show logging
This command shows the current logging configuration, server IP, severity level, and logging destinations.
9. Testing the Syslog Configuration
To test if syslog messages are reaching the server, you can generate a simple test message from the Cisco device:
Router# send log <level> <message>
For example:
Router# send log 4 "Test message to verify syslog configuration"
This command sends a test message with severity level 4 (warning). Check your syslog server to confirm it received the test message.
Example Configuration
Here’s an example of a full syslog configuration for a Cisco device:
Router(config)# logging 192.168.1.100                 ! Set syslog server IP
Router(config)# logging trap warnings                 ! Set severity level to warnings (0-4)
Router(config)# service timestamps log datetime msec  ! Enable timestamps
Router(config)# service sequence-numbers              ! Enable sequence numbers
Router(config)# logging buffered warnings 4096        ! Store warning-level logs in buffer, 4096 bytes
Router(config)# logging console errors                ! Display error-level messages on the console
Router(config)# logging facility local5               ! Set facility to local5
Router(config)# logging rate-limit 1000               ! Rate-limit log messages
Best Practices
- Log Only What You Need: Be selective with the severity level to avoid overwhelming the syslog server.
- Use Multiple Destinations Carefully: Avoid logging everything to the console or buffer, as this can use excessive memory or CPU.
- Secure Syslog Traffic: If logging remotely, consider using encrypted syslog (e.g., TLS-enabled) to secure log messages in transit, especially for sensitive environments.
Configuring syslog on Cisco devices is crucial for effective network monitoring, troubleshooting, and audit logging, allowing you to capture and store logs in a centralized location for easy management.